Impact Click Tracking for SEM with Google Ads or Microsoft Ads
This document outlines the process for implementing Impact tracking on SEM campaigns in Google Ads or Microsoft Ads using either a custom JavaScript (JS) code or a Google Tag Manager (GTM) template.
Step 1: Add the Adara JavaScript Tag to Your Site
There are two options for adding the Adara JavaScript tag to your website. This is one time step.
Option 1: Install the Adara Google Tag Manager (GTM) tag template.
Option 2: Install the Adara custom JavaScript (JS) code directly.
Option 1: Install Custom JavaScript Template in Google Tag Manager
In your Google Tag Manager account, upload and import the Adara SEM tracking template. Click to Download the ADARA SEM tracking template.
To import the template:
In Google Tag Manager, click Templates.
Click New to open a blank template in the Template Editor.
Click the More Actions menu and select Import.
Choose the downloaded
.tplfile.
After importing, set up the GTM Trigger to fire on all pages for this Tag.
Save the new tag template to your Tag Manager container.
Publish the updated container version to your website.
Option 2: Publish Custom JS Code Directly on Your Website
If you don't use Tag Manager, you can insert the following JavaScript code directly in the <body> section of your website's HTML:
Step 2: Generate an Analytics Pixel
From your Impact account, go to Insights and click Impact Setup.
Click the Pixels tab.
Click the New Analytics Pixel button in the Analytics section.
Enter your Analytics pixel information and generate the new pixel(s).
Note: Do not click the "Are you using this pixel for Adwords tracking?" box.
Record your Pixel ID (pxid) as you'll need it later.
Step 3: Add URL Tracking Template to SEM Campaign(s)
To pass the correct parameters, copy and paste the following tracking template to your SEM campaigns:
{lpurl}?adara_campaignid={campaignid}&adarapixelid={_adarapixelid}Create a Custom Parameter named
_adarapixelidand set the Impact Pixel ID as its value
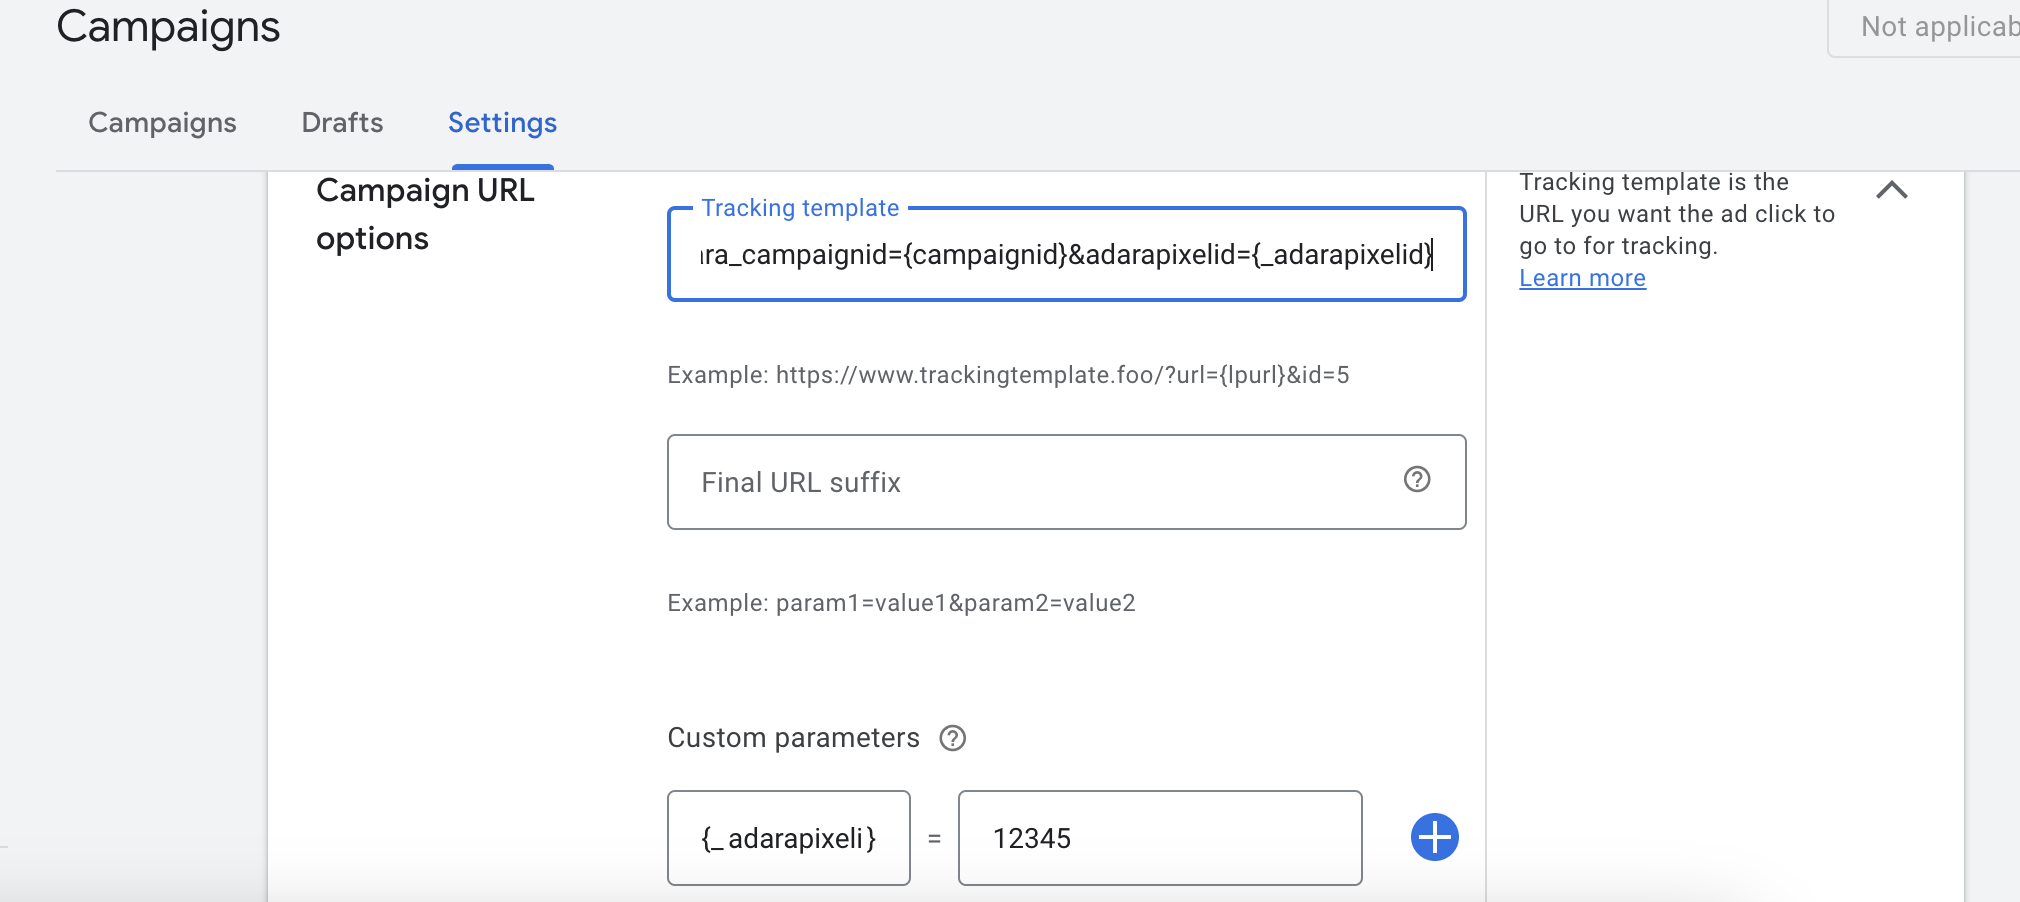
Google Ads: Adding the URL Tracking Template in the Campaign Level
In Google Ads, click All Campaigns.
From the left menu, select Settings.
Click the campaign you want to edit.
Under Additional settings, select Campaign URL options.
Paste your tracking template in the Tracking Template field.
In the Custom Parameters section, add:
Name:
adarapixelidValue: The Impact Pixel ID.
Click Save.
Microsoft Ads: Adding the URL Tracking Template in the Campaign Level
In Microsoft Ads, navigate to your campaign.
From the left menu, select Settings.
Click the campaign you want to edit.
Under Additional settings, select Campaign URL options.
Paste the tracking template in the Tracking Template field.
In the Custom Parameters section, add:
Name:
adarapixelidValue: The Impact Pixel ID.
Click Save
Step 4: Validate URL Parameters
When someone clicks your add, the URL should look like this in your address bar:
https://www.yourwebsite.com?adara_campaignid=123454567&adarapixelid=12345
If you have additional UTM parameters, then the Adara UTMs will appear at the end of the URL string.
You can also test the URL within Google/Microsoft Ads.
To validate that the tracking parameters are correctly passed to Adara, use your browser’s developer tools to check the pixel firing once you land on the website:
Open Chrome Developer Tools:
Right-click anywhere on the page and select Inspect, or press Ctrl+Shift+I.
Go to the Console tab.
Reload the page (press F5 or enter the URL again).
Check the console logs to ensure the SEM Campaign ID and Impact Pixel ID are correctly populated.

Limitations
This tracking method does not apply to Display Ads in Google Display Network (GDN). For GDN, use Impression Tracking. Please see our documentation specifically for Google Display Network.
For YouTube and DemandGen ads, append the parameters directly to the Final URL (custom tracking templates are not supported).
FAQs
How do I update my Final URL in YouTube?
Navigate to Campaigns
Go to Google Ads and sign in to your account.
In the left-hand sidebar, click on Campaigns to view all your campaigns.
For YouTube Ads: Locate and select your YouTube campaign.
For Demand Gen Ads: Find and select your Demand Gen campaign. You can filter by Campaign Type to make this easier.
Go to Ads & Extensions:
In the left sidebar, click on Ads & Extensions to view all the ads in the selected campaign.
Select the Ad to Edit:
Scroll through your ads to find the one you want to update the URL for.
Click the pencil icon (edit) next to the ad you want to modify.
Edit the Final URL:
Locate the Final URL field in the ad editing screen.
Enter the new Final URL you want to direct traffic to. Make sure the URL is correctly formatted and points to a valid landing page (ensure no 404 errors).
Review Other Settings (Optional):
If you’re using tracking templates or UTM parameters, make sure these are updated along with the new URL.
Save the Changes:
Additional Considerations:
Ad Review: Once you update the Final URL, Google might review your ad again before it goes live. Allow some time for this approval process.
Tracking Template: If your ad uses a tracking template, ensure it is updated with the correct URL parameters. (Ensure you are not double firing the Impact pixel IDs!)
URL Testing: Before saving, verify that the new URL works properly by visiting it in a browser.
Do I need to update the JavaScript on our site for each campaign?
No, this is a one-time step to add to all pages of your site, so no matter the landing page URL your campaign uses, we always check for Adara Pixel IDs.
Can I add the Adara Pixel ID to the Ad Group or Ad?
Yes! But this means you create more pixels in the Impact UI, and get more granular level reporting. However, we find that customers prefer Campaign or Ad Group level reporting.
My impressions in Google Ads do not like up with what I see in Impact UI - what is wrong?
Your Impressions are not going to align as the pixel only fires upon someone clicking your ads. So your clicks in campaign should be closely aligned with the counts you see in Impact UI. Please note that browser behavior, privacy consent compliance for your site, ad blockers, etc. could cause discrepancies on clicks. Ensure you do thorough testing!
Where do I find my Campaign ID? Will this show in Impact?
Your Campaign ID is based on your SEM Ad Campaign, and it is only used for troubleshooting purposes. This is not shown in Impact UI. The template will automatically grab your respective Google or Microsoft Ad Campaign ID.
I'm still not following, who can I reach out to for more questions?
If you need further assistance, contact ADARA Support.